
Burp Suite is one of my favorite tools for web application testing. The feature set is rich, and anything that it does not do by default can usually be added with an extension. There are a few things however, that while they exist in Burp Suite, they are not completely intuitive. Here are a few pro-tips to get the most out of your web application tests.
Password Brute forcing
Often times penetration testers will want to brute force passwords to gain access, or to test password lockout policy in an application. While tools like Hydra exist for this purpose, I find that it is much easier to tune in burp. All you need to do is start by sending the POST request associated with the logon to Burp Intruder.
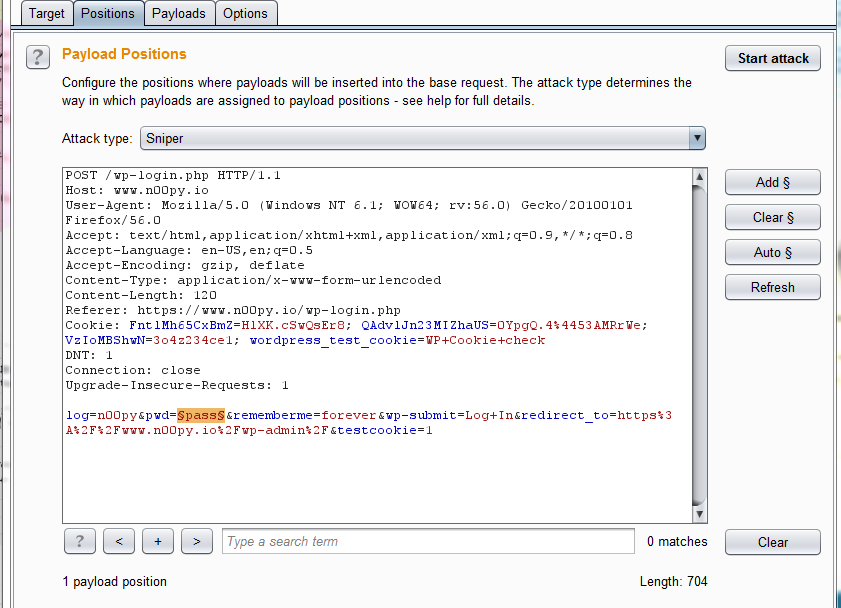
Clear out all the auto selected parameters, and then highlight the password field and click the “add” button. Keep the Attack Type as “Sniper“. Switch to the payload tab and keep the payload type set to “simple list“. Either paste in your wordlist from the clipboard, or click the “load…” button and select a wordlist file. Click the “Start attack” button. When you get the results, you are going to want to look for differences in the responses. Typically I will sort by length to find differences in responses. Another method is to click the “Options” tab and use “Grep – Match” or “Grep – Extract” to flag items with keywords or strip out certain strings from within the responses.
Password Spraying
This is going to be a similar, however in this case we are assuming we have a list of usernames. While it’s unlikely a single user has a weak password, it’s much more likely that one of many users has a weak password. We will go through the same steps, except in the positions tab we will need to highlight both the username and password fields. Also take note that we switched the attack type to “Cluster bomb“.
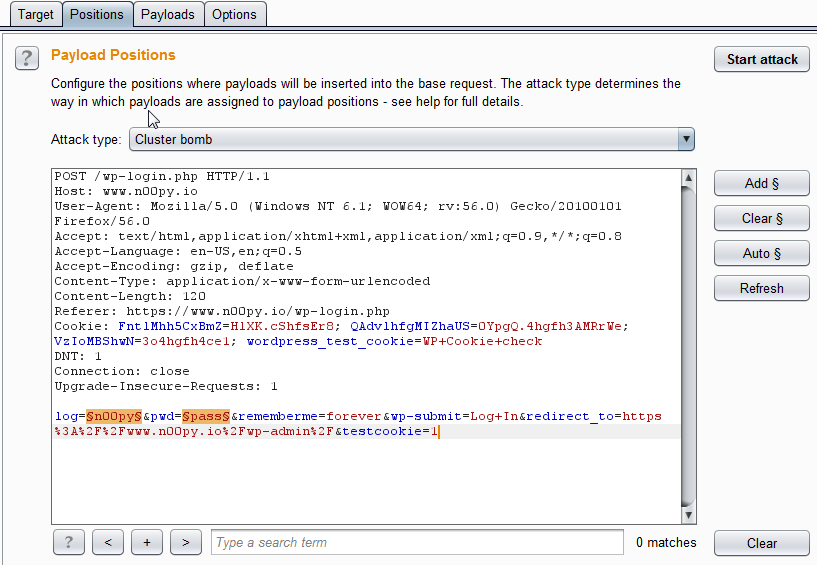
When you go to the payloads tab it will be slightly different. You will have two options under payload set. The #1 refers to the username (First highlighted parameter) and the #2 is the second highlighted parameter, the password. Both of these can be set as “Simple list“. For Payload #1 load in your username list. For Payload set #2, add in a couple simple, common passwords such as “Summer17!” or “$Comapanyname1“. I would recommend only using 3 or 5 passwords, as the targeted application may lock out user accounts. When you run the attack, it will try every username with every password specified. This means if you had 10 users, and 3 passwords each, it would send 30 requests. As before, look at the responses. Compare response lengths and consider using grep under the “Options” tab to extract data from the responses or identify keywords.
CSRF Tokens
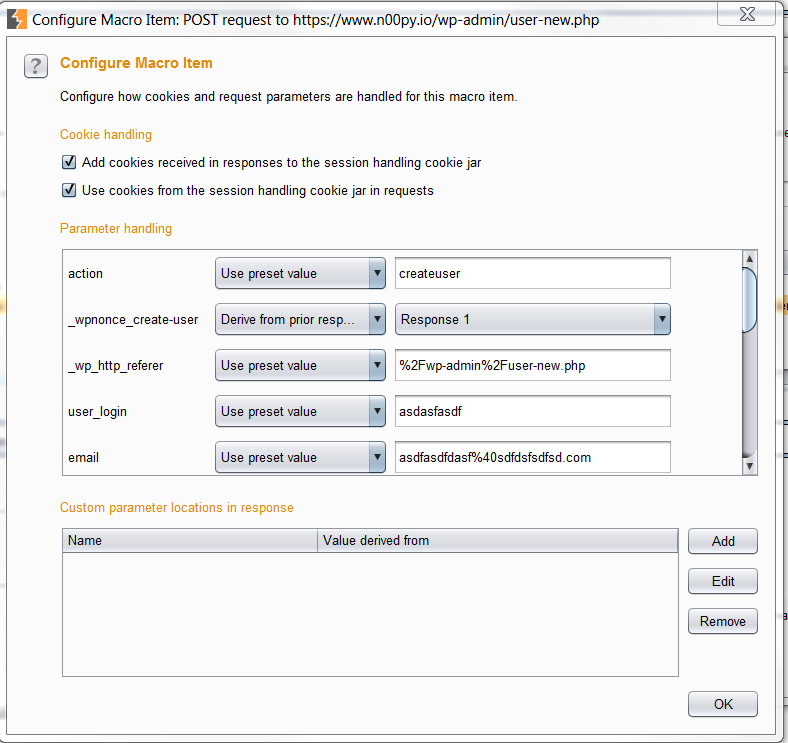
Some applications will use CSRF tokens on login pages to stop this exact type of attack. This can be really annoying for an attacker. Luckily, Burp has an answer. To do this, we can use Burp Macros. For this example I’m going to use adding a user in WordPress, reason being that it requires a CSRF token each time. You can use this same methodology against anything else, such as a login form that requires it. First step is to go to “Project Options” and click “Add” under “Macros“. You will need to include two requests, one where the CSRF token is defined, and the POST request you want to submit. In the case of WordPress, this is on the user-new.php page.
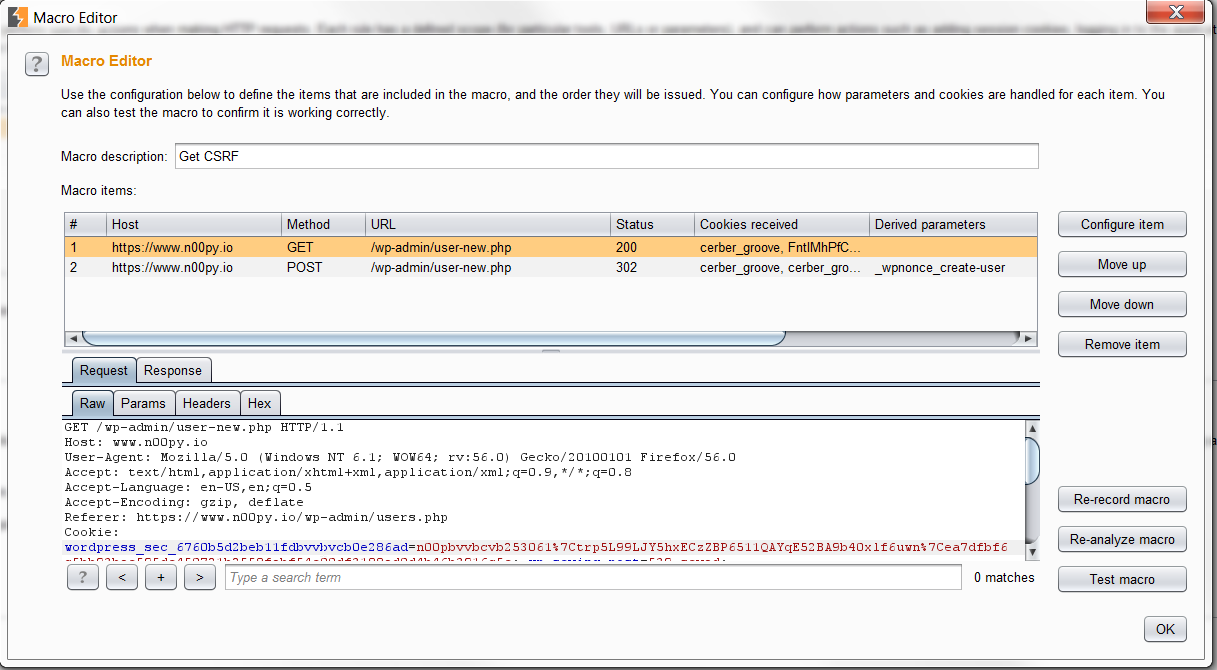 Click “Configure Item” on the first request with the CSRF token. Click “add” under the “Custom parameter locations in response“. Go ahead and find the CSRF token and highlight it. Burp will automatically add the start and end values needed for extraction. Go into the other request and and configure it as well.
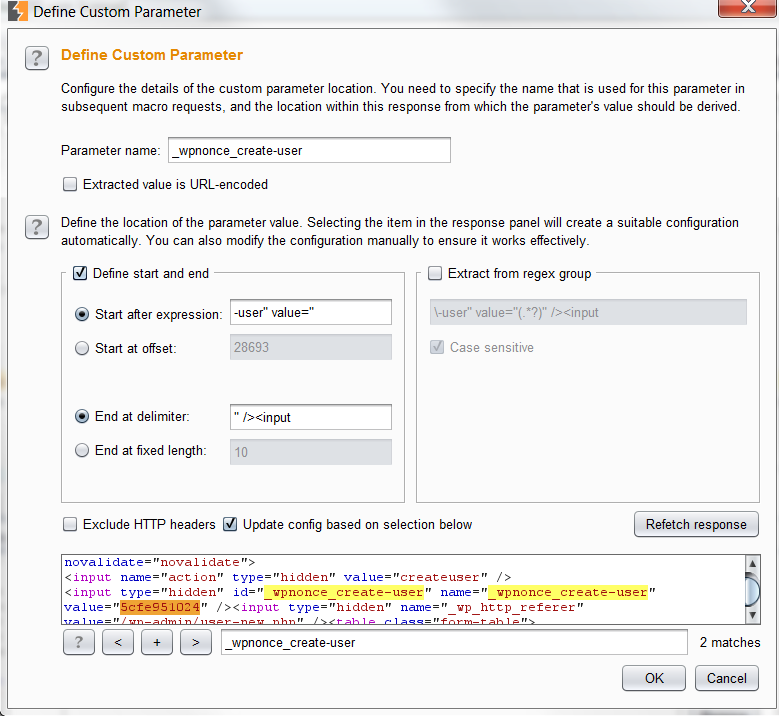 Set all the items to the preset except for the CSRF token, which needs to say “Derive from prior response“.
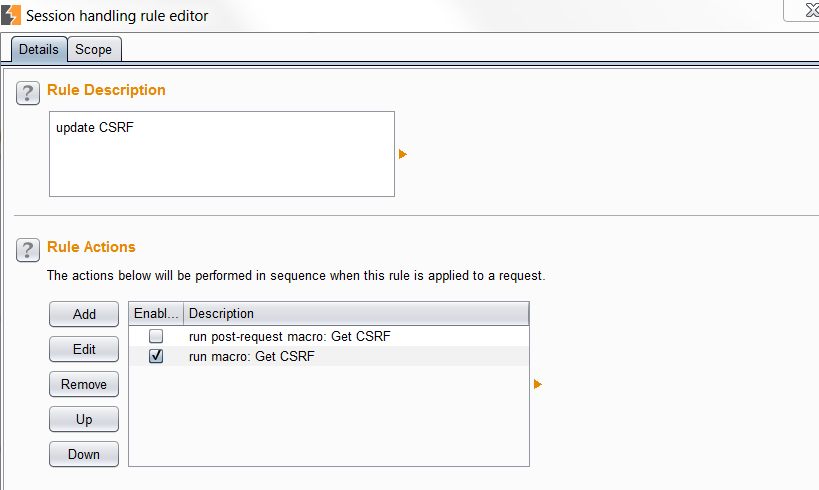
Add a new Session Handling Rule. Click add and select “run macro“. Add the macro you created earlier and click the radio button that says “Update Only the following parameters” and put in the value of the parameter that contains the CSRF token.
Take the login page or in this case, the add user POST request and send it to intruder. Set up the Intruder attack the same as if you were doing a password brute force. When you run the attack, the macro will run automatically as it is defined as a session handling rule and the CSRF token will be automatically retrieved and placed in that parameter. For a good article discussing this same thing, check out the SecureState blog.
Re-validating sessions
Sometimes when scanning a web application, the application will automatically invalidate your session if it identifies something suspicious. After your session gets invalidated, Burp continues to scan. This is not good, and we will miss findings because all the responses to Burp Scanner’s payloads won’t contain an actual response, likely a generic redirect to the login form.
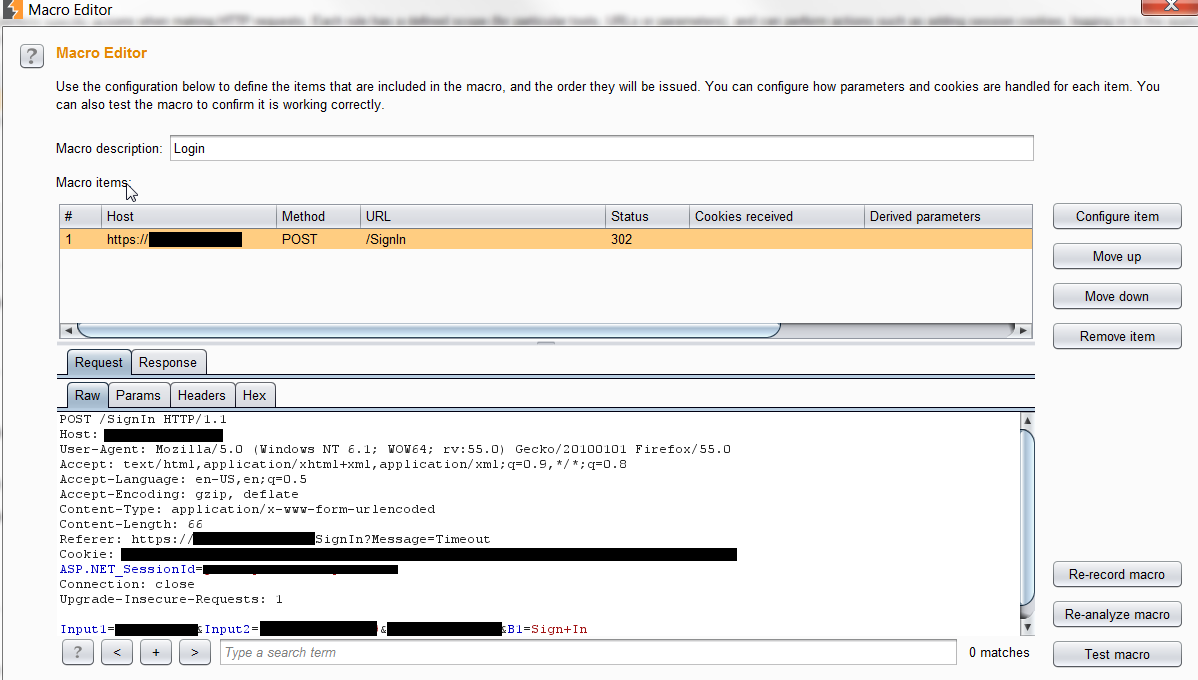
To fix this problem, we can add a Session Handling Rule, but first, we need to make a simple macro. Go to the Project Options -> “Sessions” and under “Macros” click “Add“. For the macro item, we just want a copy of the POST request performed when logging in. It will usually look something like this:
Next, we want to add a New Session Handling Rule. Click “Add” Under “Session Handling Rules“.
Under “Rule Actions” click “Add” and select “Check session is valid“.
You will need to identify some condition present when you become logged out. This will vary for each web application. You can look for a string in the response body, such as “logged out” or you can check for a re-direct to the signout/signin page.
The box you need to make sure is checked is “If session is invalid, perform the action below“. Put “Run a macro” from the drop down box and select the macro created earlier of the sign-in process.
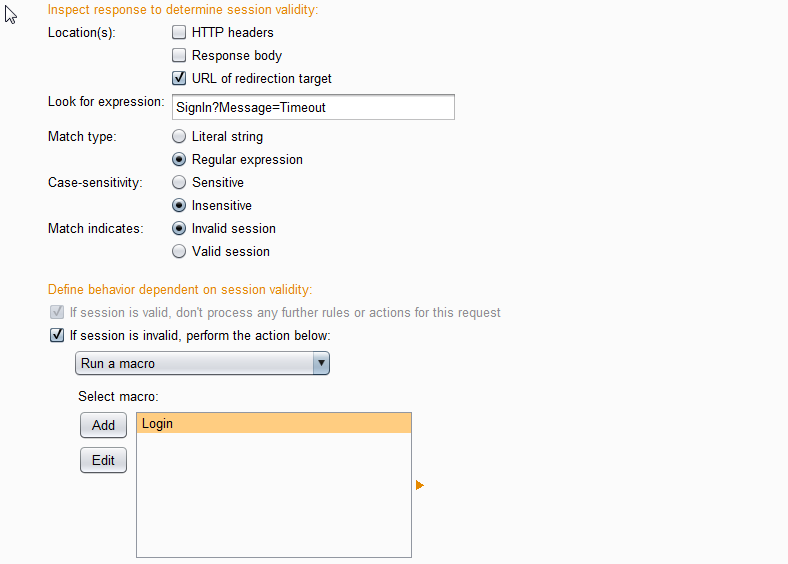
Lastly, ensure the checkbox “Update current request with cookies from session handling cookie jar” is selected, near the bottom.
Now whenever you become logged out, Burp will see this and re-authenticate, and add the new valid cookies on all subsequent responses.
For a more verbose description of this process, check out the blog from SecureLayer7.
Targeted Scanning
While simple in nature, this trick is super helpful. Most of the time I scan in Burp, I will select items in the site map and just click “Actively Scan this Host” or “Actively Scan this Branch“. While this is great, I don’t always know exactly what is being scanned, and if something is being scanned unnecessarily. To scan parameters that I specifically want to target, we can send the request to Burp Intruder. Once in Intruder, we can select the parameter we are interested in and highlight it. If we right click anywhere in the box, we have the option “Actively Scan defined insertion points“.
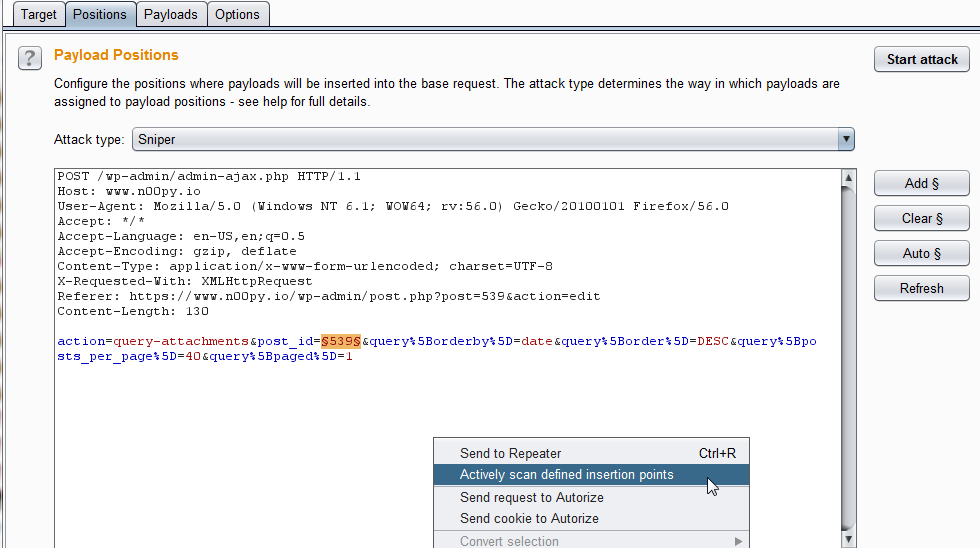
Now the scanner will focus on solely the parameter we chose. This is a fast way to target the parameters that would be likely candidates to contain a vulnerability.
Finding Hidden pages
If you have used Burp, you have probably used it to spider a page. Additionally, you can use “Discover Content” By right clicking on something, and clicking “Engagement Tools“. Both of these will find content you may not have discovered through manual browsing. Once you have browsed the website thoroughly, click in the contents pane in the center of the page and select everything. Right click and go to “Highlight“. Select any color. Now run either Spider or “Discover Content“. You will see new items added to the Contents pane, though they will not be highlighted. These are items that were newly discovered by either the spider or by “Discover Content.”

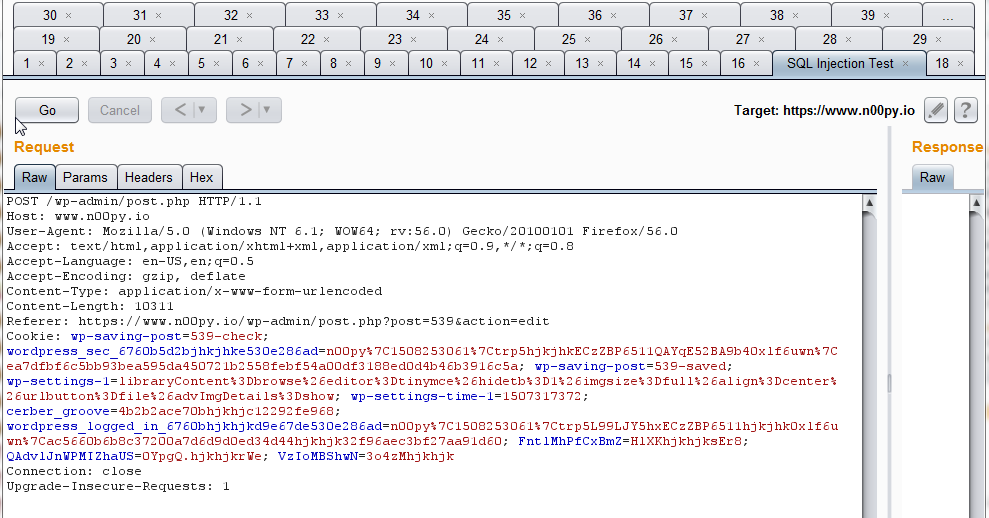
Organizing Manual Tests
When doing manual testing, you will undoubtedly end up with countless tabs open in Burp Repeater. While at the time these might make sense to you, down the road you may have no clue what the heck you were trying to do the week before, or even yesterday. A little know fact is that you can actually rename these tabs. By clicking on the number, you can actually start typing in a new name. This will help you organize your tabs in relation to what you were trying to do.
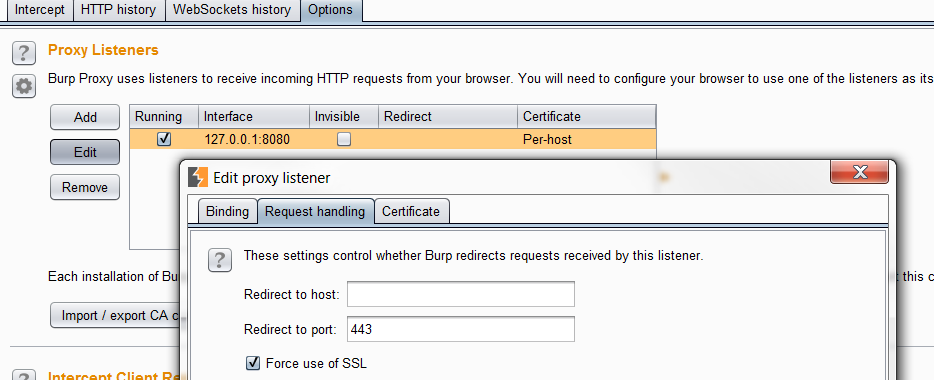
SSL Stripping
If the client is missing the Strict-Transport Security header, a demo of an SSL stripping attack may help them understand the risk. Without needing to download SSLstrip, you can simulate this attack in Burp Suite.
You will need to go to the Proxy tab and then click on the Options tab. From there edit your Proxy listener and click the box that says “Force use of SSL“.
Down below on the Options page there will be two check boxes that you will need to click, “Covert HTTPS to HTTP” and “Remove secure flag from cookies“.
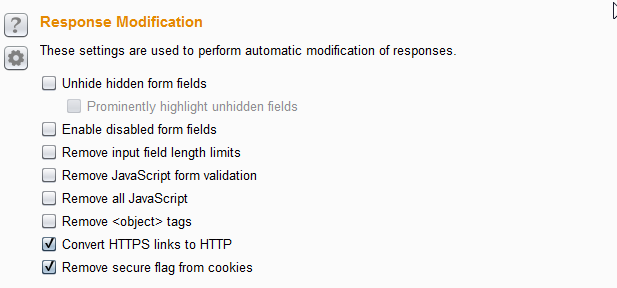 Now next time you visit the page without specifying the protocol, your browser will display the content over HTTP, and Burp will relay the content over HTTPS.
These last few tips were learned from a good DerbyCon talk given by Tim Tomes.
Here are some good articles that relate to this post:
https://diablohorn.com/2017/08/15/brute-forcing-encrypted-web-login-forms/
https://www.contextis.com/blog/testing-multi-step-forms/
http://blog.securelayer7.net/automating-web-apps-input-fuzzing-via-burp-macros/
https://warroom.securestate.com/updating-anti-csrf-tokens-burp-suite/