 Next in the series of password spraying posts, I’m going to discuss password spraying on the web based logon for F5. Previously I had written how to password spray against Dell SonicWALL, which makes use of CSRF tokens. F5 is a little different. It does not use CSRF tokens, but it does rate limit you when attempting to guess multiple passwords. After bad password attempts, you receive a message that looks like this:
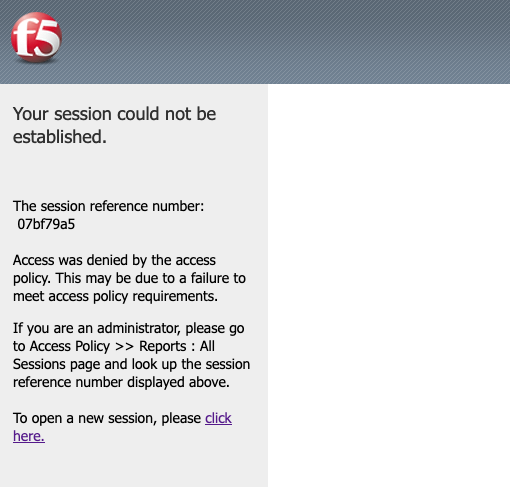 This happens regardless of whether you are using multiple usernames or the same username, 3 fails gets you blocked. Any further attempt to authenticate will hit this same error page. We can see that the error message references a session identifier and also provides a link to create a new session. Looking at the cookies, we can see that during accessing the logon page, two cookies are set, LastMRH_Session and MRHSession. We can read more about what those cookies do from F5’s official documentation.
To bypass this restriction, we can use a simple methodology. We will create a brand new session for each and every login attempt, and we can do this using Burp Suite. First, you need to get a completely fresh request to the login page. Clear your cookies or use incognito mode to do this.
Here is what we need to do to create the session handling macro to have a fresh session before each login attempt:
Step 1: Create a Macro
- Macros can be created under Project Options -> Sessions -> Macros.
- Click “Add“.
- In the Macro Recorder window, select a request to the root location of the login page. The request should look similar to this:
Note: (Some headers removed for brevity)Request:GET / HTTP/1.1 Host: f5.example.com
Response:
HTTP/1.0 302 Found
Server: BigIP
Connection: Close
Content-Length: 0
Location: /my.policy
Set-Cookie: LastMRH_Session=cc8291eb;path=/;secure
Set-Cookie: MRHSession=c9bea2dd9c2139020bd83539cc8291eb;path=/;secure
- Also click the request to /my.policy, which should look similar to this:Request:
GET /my.policy HTTP/1.1
Host: f5.example.com
Cookie: LastMRH_Session=cc8291eb; MRHSession=c9bea2dd9c2139020bd83539cc8291eb
Response:
HTTP/1.1 200 OK
Server: BigIP
....
 <td colspan=2 id="credentials_table_header" >Secure Logon <br> for F5 Networks</td>
....
- In Burp the Macro it should look similar to this:

- Click OK until you have left the Macro Editor.
Step 2: Create a Session Handling Rule
- Session handling rules can be found under Project Options -> Sessions -> Session Handling Rules.
- Click “Add“.
- Click “Add” Under Rule Actions.
- Select “Run A Macro” from the drop-down.
- Select the Macro you created earlier.
- Leave everything else default and click “OK“.
- Set the Scope on the scope tab.
If you did the steps properly, anytime you make a request, Burp will first make a request to the root of the login page and then a subsequent request to /my.policy. It should then have a new session ID added in the cookies of the request.
Step 3: Run the Burp Suite Intruder attack
I’m going to assume you know how to perform a normal password spray in Burp Suite Intruder, so this section will just address the unique parts of this. If you need to brush up, consider reading How to Burp Good. You will want to base your Intruder request off of a POST request to /my.policy. It may look similar to this:
POST /my.policy HTTP/1.1
Host: f5.example.com
Cookie: LastMRH_Session=cc8291eb; MRHSession=c9bea2dd9c2139020bd83539cc8291eb; TIN=272000

username=firstUser&password=BadPassword&vhost=standard
- We can use Burp Intruder Grep and Extract rules to both validate our attack is working and sort on failed attempts.
- Go to Intruder -> Options -> Grep – Extract
- Click “Add“.
- Make sure the “Define start and end” checkbox is checked.
- Select the “Start after expression” radio button.
- Input LastMRH_Session= into the input field.
- Select the “End at delimiter” radio button.
- Input ; into the input field.
- This will create new field showing us the short session ID so that we can confirm that it is changing each time.
- Go to Intruder -> Options -> Grep – Match
- Remove the existing default rules.
- Click “Add“.
- Input The username or password is not correct into the input field.
- This will allow us to sort the responses based upon the error message.
- Go to Intruder -> Options -> Request Engine
- Set “Number of Threads” to 1. This is important so that were are not mixing the sequence of events.
The result of our active Intruder attack should look like this: (Note: The “payload” will be whatever you set it to be, either usernames or passwords)
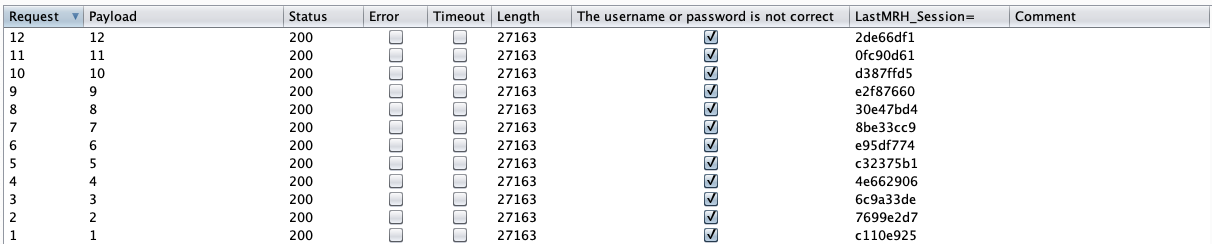 We can see from the output that each session ID is different, and we see a column we can sort on letting us know if the authentication failure message is present or not.